Welcome to Board.Vision Tutorials. In this tutorial, we will walk you through the steps to create an approval.
Important Note: Board.Vision web app is supported on Google Chrome (version 65.0 and later) and Microsoft Edge (version 87.0 and later).
To create an approval:
1) Log in to your Board.Vision account using your registered email address and password.
2) From the left navigation menu, go to Approvals, and click on +Add Approvals.

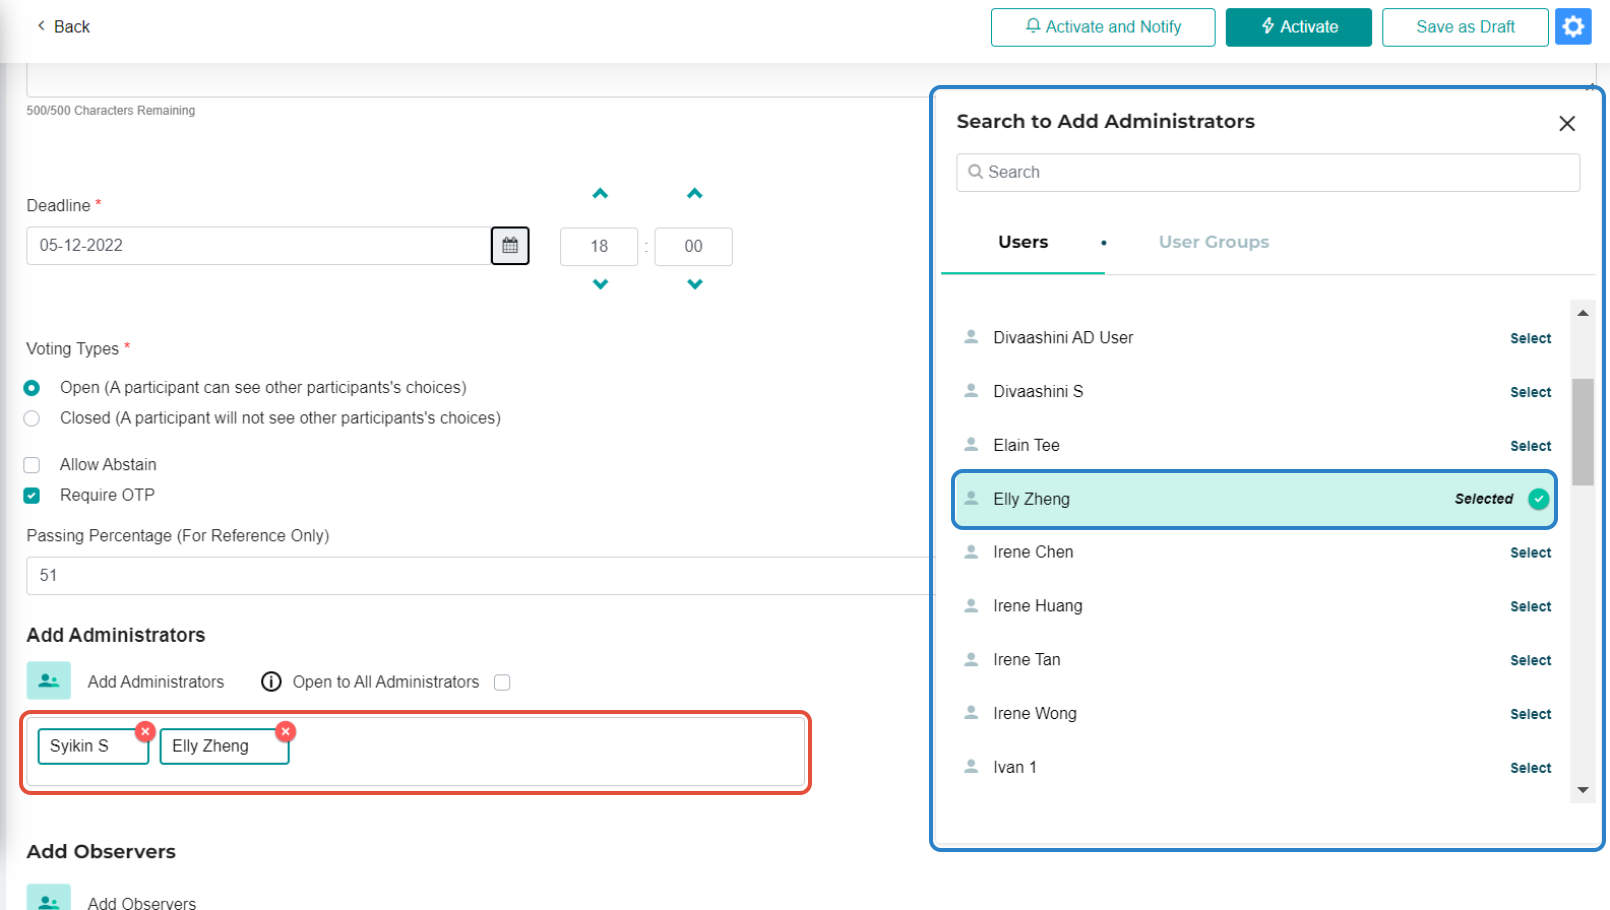
3) On the Add Approval page, enter the mandatory Approval Name & Deadline, as well as Description (if any).

4) For Voting Types, select the following options:
a) Open - if you want all the participants to see other participants' votes.
b) Closed - if you do not want all the participants to see other participants' votes.
c) To Allow Abstain and/or Require OTP.

5) To add Administrators, first click on the white box under the Add Administrators section, then select the Administrators you wish to add from the Search to Add Administrators pop-up window.
6) To add All Administrators, select the Open to All Administrators checkbox.
Important Note: By selecting the Open to All Administrators checkbox, all the Administrators (Product Owner/Super Administrator/Elevated Administrator/Normal Administrator) within the company, will have the access to this Schedule. Administrators will also be notified when the Schedule has been activated or when the Participants have proposed an alternate date / added remarks.
By removing all Administrators from the Add Administrators section, once the Approval has been activated, the system will autoselect the Open to All Administrators checkbox.

7) To add Business Users as Observers, first click on the white box under the Add Observers section, then select the Administrators you wish to add from the Search to Add Observers pop-up window.
Important Note: As an Observer, the Business User will be able to view Approval details and documents only. and will NOT be able to act on the Approval.

8) To add Business Users as Participants, first click on the white box under the Add Participants section, then select the Business Users you wish to add from the Search to Add Participants pop-up window.
Important Note: You are required to select a minimum of 2 Business Users as Participants.

9) You can also type in the Business User’s name in the white box provided within the Search to Add Participants window and select the name from the Users list. This will add the Business User(s) to the Add Participants section. 
10) If you have created User Groups such as committees within your organization, you can add User Groups as Participants.
First, click on the User Groups tab from the Search to Add Participants window. Then, select the User Group from the User Groups list. e.g The ‘Investment Committee’ has been added as a Participant.

11) To recuse Business Users, first, click on the white box under the Recused Participants section, then select the Business Users you wish to add from the Search to Recuse Participants pop-up window.
Important Note: Once recused, the Business User will NOT be able to view the Approval details and documents.

12) To add the Approval Document, first, click on Choose File, then enter the mandatory Title and Description (if any).
If you wish to disallow Business Users to download the Approval document, deselect the Allow download checkbox.

13) Click on Save as Draft to add the Approval supporting document (if any).
(If there are no supporting documents to be uploaded, you may skip to step no.16)

14) Once you have clicked on Save as Draft, you will be directed to the draft View Approval Page.
To add in Supporting Document, click on Add Document under the Supporting Document section.

15) On the Add Supporting Document pop-up window, select Choose File and input a mandatory Title and Description (if any).
If you wish to disallow participants to download, uncheck the Allow download option. Then, click on Upload.

Before activating the Approval, you may set some Approval settings.
16) Click on the Settings icon at the top right.

17) On the Approval Advanced Settings pop-up window, select the following options:
a) Notify Administrators when participants acted on this Approval.
b) Notify Administrators when the passing condition is met. You may add additional recipients by entering the email address into the field provided.
c) Allow Business Users to view COC. The Certificate of Completion (COC) report will be generated once the Administrator has finalised the Approval outcome.
d) Set Auto Reminder. A reminder will be sent via email and push notification to the Business Users (and their PAs) who have not submitted their response before the deadline. This option will be available only if the auto reminder settings have been enabled, in the company's Global Settings. To find out how to set an auto reminder for Approvals, click here.

18) Then, click on Update.

19) To activate the Approval and notify the Participants, click on Activate and Notify.

20) On the Notification pop-up window, select the following options:
a) Notify via Email and/or Push Notification.
b) Under the Notify Participants & Executive Assistants section, select the Business Users and their PAs you wish to notify.
c) Under the Notify Observers section, select the Observers you wish to notify.
Then, click on Confirm.
Important Note: To expand the Participants & EA, as well as the Observers list, click on the arrow down icon next to the Notify Participants & Executive Assistants or Notify Observers header.

You have completed the tutorial on how to create an approval.
If you face any issues, please reach out to our Board.Vision Customer Success Team at support@board.vision or +65 6909 7100 and we will be happy to help.
Our hotline operating hours are from Mondays to Fridays 9:00 AM to 6:00 PM SGT (excluding public holidays).
Was this article helpful?
That’s Great!
Thank you for your feedback
Sorry! We couldn't be helpful
Thank you for your feedback
Feedback sent
We appreciate your effort and will try to fix the article